Creating Head Models
Note
The following describes head model creation using charm. For head modeling with headreco or mri2mesh in older SimNIBS versions, please see here.
MRI Scan
To create individualized models, SimNIBS requires a T1-weighted image. T2-weighted images are optional, but recommended.
T1-weighted images
Commonly used for segmentation of the brain. Usually acquired at a rather low readout bandwidth to maximize SNR. However, using a low readout bandwidth comes with the disadvantage that the positions of the (fatty) spongy bone and subcutaneous fat will be displaced in the MR images due to the chemical shift artifact. This can result in the spongy bone touching brain gray matter (GM), and rendering an accurate segmentation of the GM pial surface and the boundary between cerebrospinal fluid (CSF) and skull is difficult. For this reason, we recommend to acquire the T1w images with a fat suppression method such as selective water excitation. Specific sequence parameters can be seen at Nielsen et al., NeuroImage, 2018.
T2-weighted images
As both CSF and compact bone are dark in T1w images (also spongy bone will be dark when fat suppression is used), an accurate reconstruction of the skull is difficult when only a T1w image is available. For this reason, we recommend to additionally acquire a T2w image without fat suppression. T2w images are usually acquired at a high readout bandwidth, minimizing the chemical shift artifact. As they also provide very good contrast between CSF (bright) and compact bone (dark), they are a good starting point for segmenting the skull. For specific sequence parameters, please see Nielsen et al., NeuroImage, 2018.
Good and Bad T1w and T2w images

Good T1w and T2w images
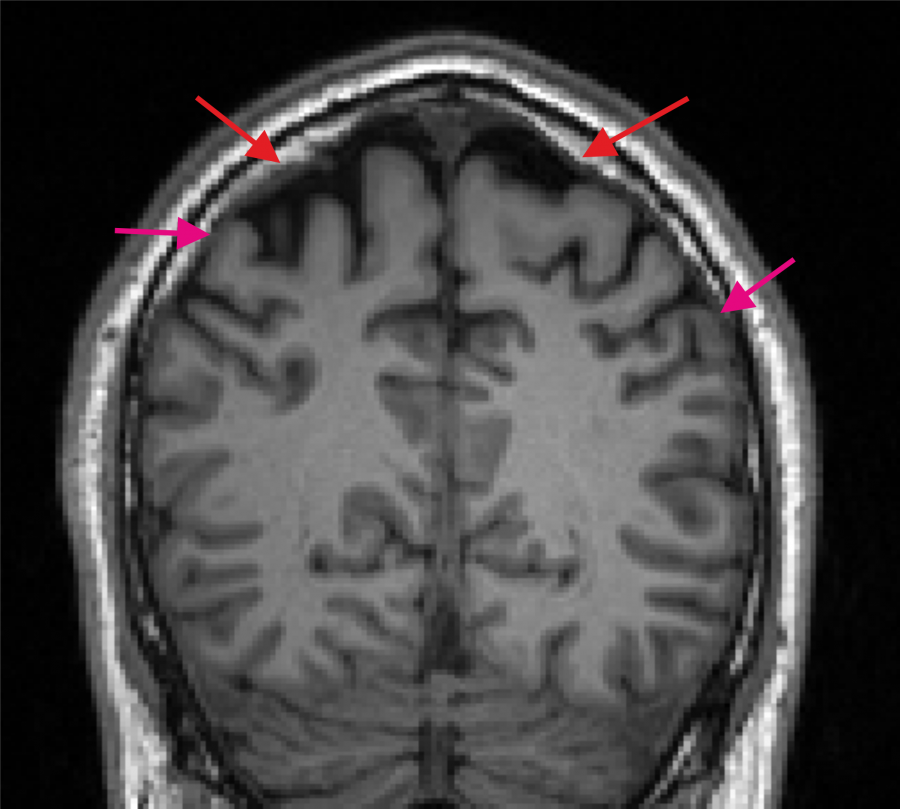
Bad T1w image. The spongy bone is in part very bright (indicated by the red arrows) and a dark CSF region to separate GM and skull is missing at several positions (purple arrows indicate example positions).
Segmentation and Meshing
After scanning and having the MRI images in NifTI format, the next step is to create a head mesh. To do it,
Start a Command Prompt/Terminal window (Windows Instructions)
Navigate to the folder where the NifTI files are located (use the
cdcommand)Run the segmentation and meshing pipeline charm. For example, for the ernie dataset, run
charm ernie org/ernie_T1.nii.gz org/ernie_T2.nii.gzThe subject ID (subID)
ernieis given as first argument. Charm will create a folder namedm2m_erniethat contains the segmentation results and the head mesh for the FEM simulations. The input images are given as final arguments (first the T1, then the T2).
Alternatively, the reconstruction can be run with only the T1w image as input, but this can result in a less accurate skull region:
charm ernie org/ernie_T1.nii.gzOptionally, charm can use the results of FreeSurfer’s recon-all instead of the internally created pial and white matter surfaces for fine-grained reconstructions of the sulci and gyri of the head meshes (–fs-dir RECONALL_RESULTS_DIR). As of SimNIBS version 4.6, the differences will be minor. Please see charm for details and the command line help for all available options.
Check the segmentation. Open the charm_report.html document inside the m2m-folder of the subject. The viewer shows the outlines of the reconstructed tissue compartments, enabling a visual check whether the outlines are accurate.
Troubleshooting
If you encounter spurious segmentation results this could be due to a suboptimal affine registration between the anatomical image(s) and the atlas. Please see the tutorial Fixing the Affine Registration.
Please see the tutorial How to manually edit a head model in case manual fixes to the segmentation are needed.
If you want to embed a custom-created mask (e.g. of a lesion or tumor) in the head model, please see the description of the command-line tool add_tissues_to_upsampled.
Further Reading
For more information on head meshing, please see: